Best GoPro Settings for Instagram
Have you ever scrolled through Instagram and seen a vertical video that just stops your thumb? That’s the power of a well-shot GoPro Reel - engaging and perfectly tailored to the 9:16 format Instagram loves.
If you want to get the most out of your GoPro footage on Instagram, you’re in the right place. Below, we’ll show you exactly how to dial in the best GoPro settings for Instagram so your Reels look amazing and reach more people.
Even if you’ve been posting for a while, you’ll find plenty of useful tips here to level up your content, especially with how unpredictable the Instagram algorithm can be.
Why GoPro Works for Instagram Reels
GoPro and Instagram seem like a perfect match - and in many ways, they are. The GoPro’s small size, rugged build, and ultra-wide lens make it ideal for travel, vlogs, and behind-the-scenes moments. Plenty of creators already use GoPro to capture vertical footage for Reels and Stories.
But here’s the thing: a lot of people still struggle with getting their GoPro videos to actually look good on Instagram.
Just scroll through any GoPro or creator forum, and you’ll see the same questions pop up again and again: “Why doesn’t my GoPro video fill the screen on Stories?”
The truth is, GoPro doesn’t shoot in Instagram-ready format by default. You can look at the Requirements for Instagram, as listed right on GoPro’s official support page, and see why:
- Instagram expects 9:16 vertical video
- Minimum resolution of 720p
- Minimum frame rate of 30 fps
- Recommended format is MP4
- And even the cover photo has its own ideal size: 420 × 654 px
If your GoPro footage isn’t set up with these in mind, Instagram will crop or reformat it. That’s why getting your settings right from the start matters so much.
Let’s fix this once and for all.
How to Make GoPro Videos Fit on Instagram Perfectly
We’ve broken everything down into 8 key steps, starting with the most important GoPro setup and ending with upload tips that’ll help your Reels perform better.
1. Nail the GoPro Aspect Ratio for Instagram (9:16 or 8:7)
Instagram Reels, Stories, and even feed videos are built for vertical viewing. The magic number is 9:16, that’s 1080 pixels wide by 1920 tall. If your GoPro footage isn’t in that format, Instagram will crop it automatically, which often means awkward framing or wasted space.
GoPro doesn’t record in 9:16 by default. But there’s a workaround.
The best move is to record in 8:7 on a newer GoPro (like the HERO11, HERO12, or HERO13). This taller frame gives you extra vertical room, so you can crop perfectly into 9:16 during editing, helping you deliver the clean, full-screen experience that keeps Instagram followers watching.
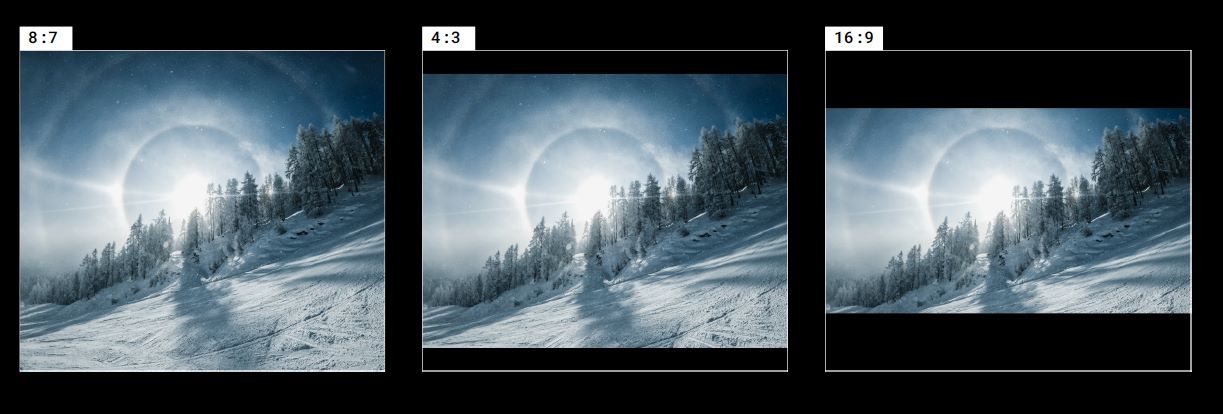
Not using 8:7 yet? You’re probably stuck with 16:9, which is landscape. In that case, turn your GoPro physically vertical (yes, just rotate it) before you hit record. It might feel weird, but it works - and it’s how GoPro designed portrait shooting to function.
Quick tip: Always frame your shot with cropping in mind. You don’t want to “cut off” your head (or the action) later.
2. Resolution & Frame Rate (Quality Without Compromise)
Next setting you’ll want to check is resolution and frame rate. These two make a huge difference in how sharp and professional your GoPro clips look on Instagram.
- Start with resolution GoPros can shoot in everything from 1080p to 5.3K, but for Instagram Reels 4K hits the sweet spot. It gives you clean details and enough flexibility to crop into vertical (9:16) without sacrificing quality. If you’re using an 8:7 mode, 5.3K gives even more room to work with.
- Then there’s frame rate Stick with 30fps for standard clips (it looks natural and matches Instagram’s preferred playback).
- If you want to slow things down or smooth out movement 60fps is your go-to Just avoid going higher - Instagram compresses videos hard, and ultra-high frame rates don’t hold up well after upload.
And here’s something most people don’t realize: Instagram saves its best video quality for top-performing creators. So your uploads might get hit with heavier compression, especially if the file isn't optimized going in. That’s why starting with a high-res, well-formatted video is critical - you’re giving the algorithm less room to wreck your quality.
3. Choose the Right Lens Mode (Ditch the Fisheye)
That signature GoPro wide-angle look is cool for action shots, but not always great for Instagram Reels.
By default, GoPro shoots with a super wide field of view, which can make people look stretched and scenes feel distant. On Instagram, that distortion can hurt your composition.
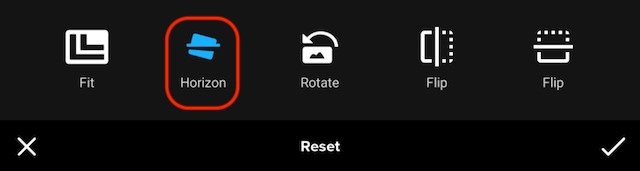
To fix it, switch to Linear or Linear + Horizon Leveling (if your GoPro supports it). These lens modes flatten the image, remove fisheye distortion, and help your footage look more natural - especially for talking head content or anything up close.
If you’re doing action-heavy shots or scenery, Wide or even SuperView still has its place, but just know you’ll likely need to reframe later when fitting it to 9:16.
4. Turn On Stabilization (No One Likes Shaky Reels)
Ever watched a Reel that made you slightly seasick? Shaky footage is one of the fastest ways to lose viewers.
Luckily, GoPro has some of the best in-camera stabilization out there. If you're using a HERO8 or newer, make sure HyperSmooth is turned on. Newer models like the HERO12 or 13 even let you dial it up with HyperSmooth Boost.
Don’t overthink it - just keep stabilization on by default.
Just one thing to keep in mind: not all GoPro models stabilize equally. People consistently point out that older models (like the HERO5 or HERO6) have weak or barely usable stabilization. HERO7 was the real breakthrough, and everything after that is fair game for Reels.
5. Protune & Bitrate Settings (For Advanced Creators)
Those first four settings will be enough for most people. But if you want to push your GoPro footage even farther, turn on Protune.
Protune gives you full control over how your GoPro captures video. It’s built for creators who want to color correct and squeeze out every bit of quality before uploading to Instagram.
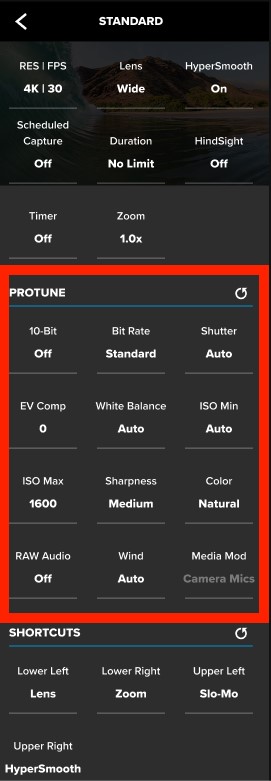
Here’s what to dial in:
- Bitrate: Set it to High. This increases video detail and helps your footage survive Instagram’s compression.
- Color: Choose Flat if you plan to edit and color grade. It gives you a neutral base. If not, GoPro Color is plug-and-play.
- Sharpness: Set it to Low. GoPros tend to oversharpen by default. Keeping it low gives you a cleaner look.
- EV Compensation: Drop it to –0.5 to preserve highlights. GoPros often overexpose bright scenes, and this helps balance things out.
Not all GoPro models support the same Protune options. For example, 10-Bit Color is only available on HERO11 and newer. Some settings (like Protune on the HERO11 Mini) can only be changed through the GoPro Quik app. So, before you tweak anything, check your user manual.
6. Transfer Your Footage Safely (Backups First)
Before you crop, grade, or add trending audio, get your clips off the SD card and into two places: your editing machine and a backup drive or cloud folder.
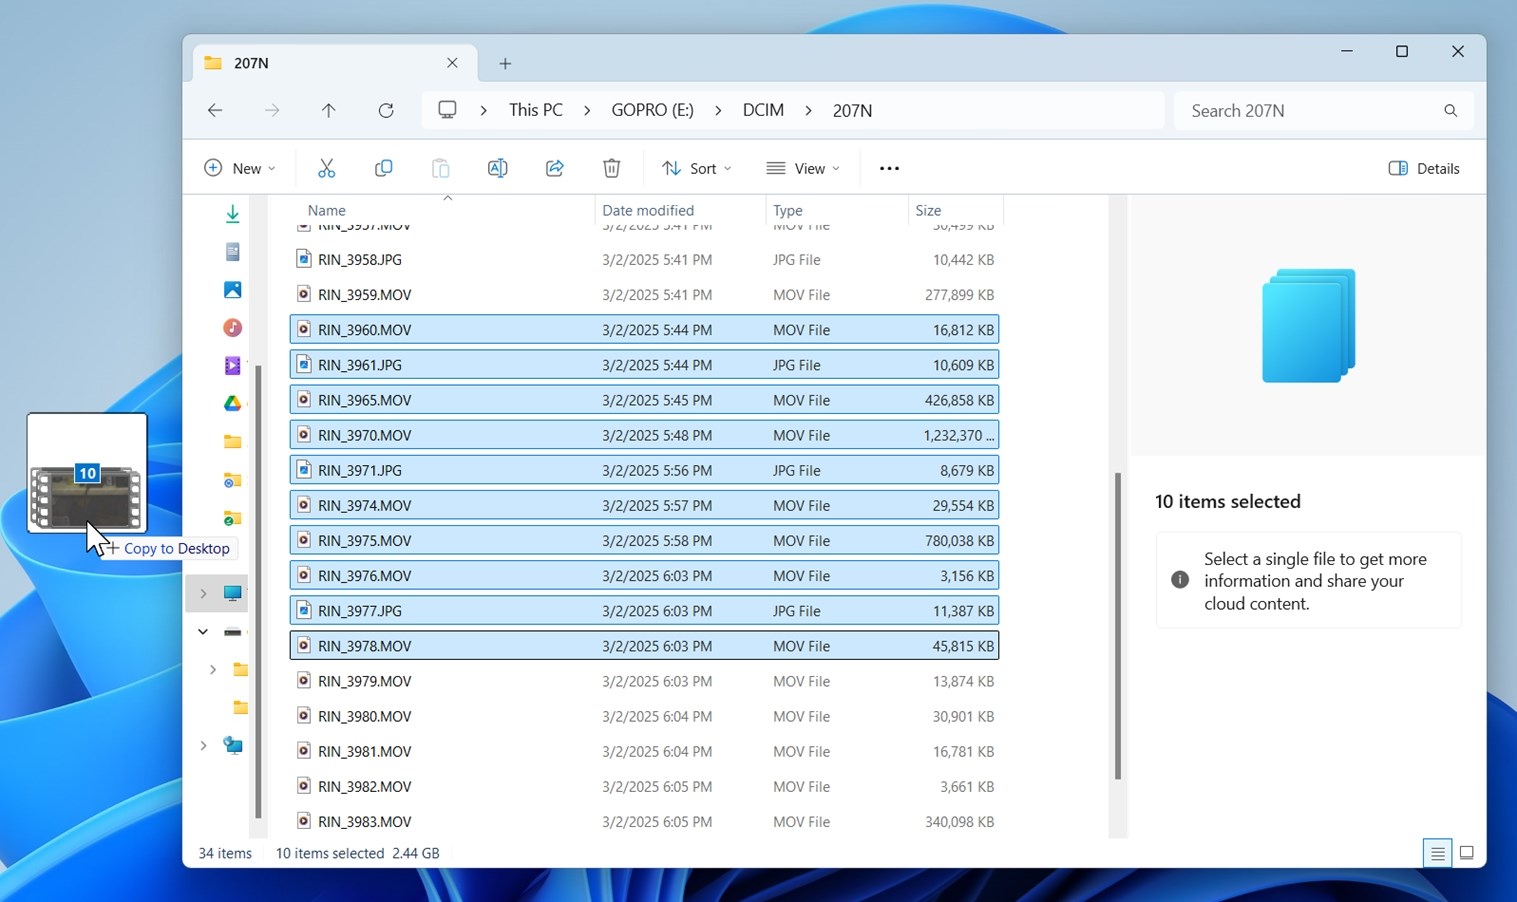
You don’t want to lose something you can’t reshoot, so play it safe. And hey, if you do mess up, know that it’s often possible to recover deleted GoPro files; we’ve had to do it more than once (because even we forget to back up).
If that ever happens, you can find detailed steps over on 7 Data Recovery Experts. It’s actually easier than it sounds.
Once your footage is safe, you’re ready to start editing, and yes, if you prefer working on a bigger screen, you can post directly to Instagram from desktop. Just head to instagram.com, log in, and upload like you would from your phone.
If everything’s fine here, you can move on to the next step.
7. Edit and Format for Instagram
You’ve got the footage, now it’s time to shape it for Instagram. As you already know, you’ll need to crop it first. To format your GoPro to Instagram the right way, you can use:
- GoPro Quik app - quick and simple if you're editing on your phone.
- CapCut or InShot - great for mobile editing with more control over effects and overlays.
- Premiere Pro, Final Cut Pro, or DaVinci Resolve - ideal for advanced color grading and clean vertical exports.
Crop to 9:16. If you shot in 8:7, you’ll have extra vertical room - perfect for reframing. If your footage is in 16:9, you’ll lose the sides, so center your subject well when filming.
And once your video is cropped, styled, and looking sharp, give it a strong finish with a caption that adds context, emotion, or personality. Inspirational captions, in particular, work well with travel, lifestyle, or outdoor GoPro content.
8. Export & Upload
Now the final step. Don’t let Instagram’s compression tank your quality at the finish line.
Here’s how to export your GoPro videos for Instagram Reels without losing all that detail. Use these settings:
- Resolution: 1080 × 1920 (9:16)
- Frame Rate: 30fps (stick with what you recorded)
- Codec: H.264 or H.265 (HEVC)
- Bitrate: At least 20 Mbps; higher if your editor allows it
- Audio: AAC, 44.1 or 48 kHz
These specs give you a solid shot at retaining sharpness even after IG compresses the upload.
And that’s it. You’re now fully equipped to turn your GoPro clips into high-performing, vertical-ready Reels that actually look good. And get seen.
Want to go even further? There are a few bonus strategies you can use to boost your Instagram reach even after you’ve nailed the video settings.
Quick Recap
Before we wrap, we want to leave you with this quick checklist - a cheat sheet you can keep in mind anytime you're prepping GoPro footage for Instagram:
- Shoot in 8:7 (or rotate camera vertically if needed)
- Crop to 9:16 for Reels and Stories
- Use 4K resolution at 30 or 60fps
- Turn on HyperSmooth (especially for handheld shots)
- Use Linear + Horizon Leveling for natural-looking footage
- Set Protune bitrate to High, sharpness to Low, and EV Comp to –0.5
- Export at 1080 × 1920, H.264/265, 20 Mbps or higher
- Transfer files properly and enable Upload at highest quality in Instagram settings
Now you’ve got the workflow, the settings, and the cheat sheet. All that’s left is to hit record and start creating content that actually looks as good on Instagram as it did in real life.